

Adding unique user fields helps to provide your organization with important information about your students.
How to Add a User Field:
- Go to the “Administration” tab.
- “User Field Layout” from the menu.
- You will need to first add a category, so select the “Add Category” button.
Now that you have added a category, you are ready to add a field – select the “Add Field” button. You will see that you have user field options to choose from: Common and Custom.
*Common Fields: These are fields that are used by the majority of organizations (such as phone number, address, etc.).
*Custom Fields: This gives organizations the ability to create their own fields that may not necessarily be fields that are often used.
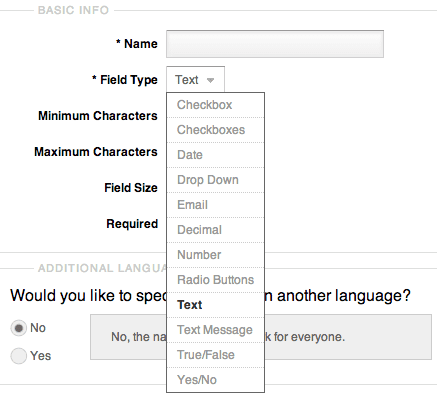
 If you choose to create a custom field there are a number of field types that you can choose from such as text, checkbox, date, drop down, email, radio buttons, etc.
- You can also modify the field size to make it smaller or larger.
- If you require this information from each and every student, you can choose the “Required” option and the student will have to fill in this information during the account creation process.
 If you choose to create a custom field there are a number of field types that you can choose from such as text, checkbox, date, drop down, email, radio buttons, etc.
The user field information can be easily exported in a number of different ways:
Instructor Gradebook – To pull the user field information for students from the instructor grade book you will:
- Go to the Instructor Gradebook tab.
- Click the ‘”Export” option found in the top left corner.
- The user field layout options will be at the bottom of the list. You can check, and uncheck, the fields that you need information for.

- After selecting which information you want to be exported, click “Save”. This will automatically save as a CSV file, which you can open with Microsoft Excel.

Reports:
- Go to the “Administration” tab.
- Select “Reports” from the left menu.
- Choose the “Detailed Students Report“ option – you will then need to select the user fields you would like the information pulled for.
- You view this information as a PDF file, a CSV file, and/or an HTML file.
0 Comments