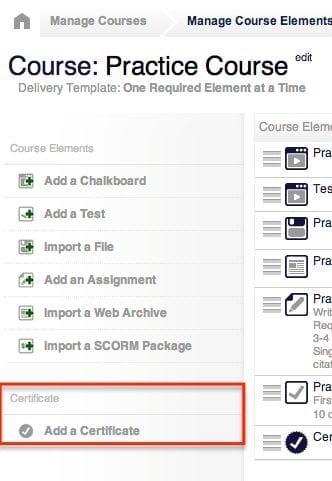
With DigitalChalk’s online training software, you have access to a fully customizable certificate feature. Just follow these simple steps to easily customize the background for any of your certificates.
1. You will start off by going to the “Manage Courses” tab.
2. Select the course you want to add or edit, and choose the “Manage Courses Elements” option.
3. To add a certificate element, select “Add a Certificate”.

4. If you have already created a certificate that you want to edit you can do so by clicking on the title of the certificate.
• Recommended image size: 1200 x 928
• Printed image size: 11″ x 8.5”
• Printable image format: a .PDF file which is centered in landscape orientation
• File type: .PNG, .GIF, or .JPG format
5. Click the “Upload Background Image” button, and select the background you would like to use.
6. After the image is finished uploading click “Save” and your new background will be set for the certificate.

*Quick tip: Not pleased with the way the background turned out? Use the “Reset Background” button to instantly revert it back to the original background image. Already have fields in place? No worries, when resetting the background you will not lose any of those fields and they will stay in the spot you put them at.
