Keynote is quickly becoming a popular choice among Mac users to create slideshows, so it is important to know how to save and upload it to the DigitalChalk eLearning platform. It is a simple process similar to saving PowerPoint presentations.
Saving a Keynote slideshow:
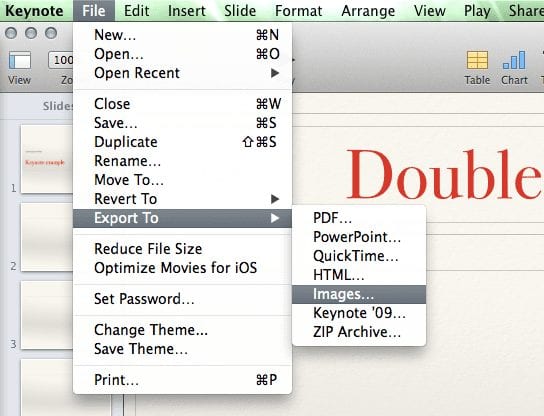
 Select “File” from the menu bar.
- Select “Export To” and then “Images”.
- Make sure that the Format option is set to JPEG (High Quality) and then select “Next”.
- After clicking “Save”, you will be brought to the save window.
- The slides will be saved as individual images in a folder (the folder will be titled the same as the slideshow). Open the folder and select all of the individual slides, then right click and select “Compress Items”.
- This creates a new file in the folder that will be labeled “Archive.zip” – this is the file you will want to select when uploading to a chalkboard.
 Select “File” from the menu bar.
To upload your slideshow you will:
- Go to the “Manage Courses” tab.
- Select “Manage Course Elements” for the course you want to add the slides to.
- Create a new chalkboard by clicking on “Add a Chalkboard” option underneath the “Course Elements” menu on the left. If you have already created a chalkboard you will choose “Edit Chalkboard” or “Edit the Live Version” if it has already been activated.
- Now that you are in the edit screen for the chalkboard, go to the “Mange Slides” option.
*Helpful hint: Save this file to your desktop so that it is easier to find when uploading to the chalkboard.
Need a guide for adding slides to the timeline? Take a look at this video tutorial.